Advancements in Industrial Computed Tomography and Metrology
Recent years have seen substantial advancements in industrial computed tomography (CT), particularly in speed, automation, and accuracy. These improvements have expanded the application of CT beyond traditional research, development, and failure analysis, establishing it as a crucial technology for precise three-dimensional measurements on production floors. The non-destructive capability of CT to capture and analyze internal structures in high resolution and three dimensions has made it increasingly valuable for production processes.
The Emergence of CT in Production Environments

Industrial CT has progressed to the point where it is now being employed on production floors for dimensional measurements. The technology’s ability to quickly capture hidden internal geometries offers significant advantages over traditional optical or tactile coordinate measuring machines, which often require destructive methods or expensive fixtures. CT technology, long used in quality laboratories, is now integral to measuring and imaging complex components and tools during production.
Industries such as aerospace, automotive, and medical technology have been pioneers in adopting CT for measurement tasks. Typical components analyzed include connectors, multi-material assemblies, injection nozzles, turbine blades, and implants. The rise of additive manufacturing has further propelled the use of CT, as it allows for the measurement of interior geometries previously inaccessible by other methods. CT technology has proven essential in optimizing development, initial sampling processes, and production ramp-up, as well as ensuring quality control and process optimization.
Comprehensive Geometry Acquisition
CT technology enables the complete three-dimensional capture of a sample’s geometry with high information density. This capability opens new possibilities for quality control, allowing for the creation of virtual sections and automatic porosity analysis. Such analyses provide critical insights into manufacturing processes, such as the quality of injection molding or the stability of workpieces. For example, nominal/actual comparisons display geometric deviations on a color scale, revealing the distribution of defects and guiding subsequent machining processes.
Calibration and Measurement Accuracy in CT Systems

To achieve precision in CT measurements, systems must undergo rigorous calibration. Manufacturers calibrate essential components, such as the flat panel detector and X-ray tube, ensuring the system’s accuracy, which can reach within a few micrometers for microfocus systems. The physical measurement process involves acquiring 2D X-ray projection images by rotating the test object on a precise manipulation system. The quality of these images, influenced by the X-ray source, detector, and system geometry, determines the raw data’s accuracy.
Optimizing the Process Chain for Precision
The introduction of the VDI 2630 guideline has standardized the assessment of measurement accuracy in high-resolution CT systems. This guideline, adopted by manufacturers, defines industrial standards for determining the suitability of CT systems for inspection processes. The accuracy of CT measurements depends on a stable system design, optimized hardware and software combinations, and rigorous calibration. Historically, the time-consuming nature of positioning, initial calibration, and regular re-calibration deterred potential users. However, advances in CT systems have simplified these processes, making CT a more accessible option for production environments.
Case Study: The Phoenix V|tome|x M
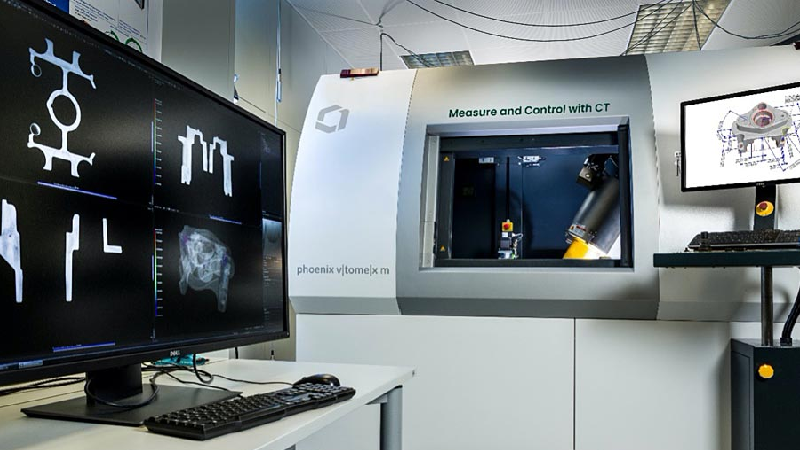
The Phoenix V|tome|x M300 scanner from Waygate Technologies exemplifies the advancements in CT technology. This 300kV microfocus CT system, designed for 3D metrology and defect analysis, integrates various proprietary innovations that ensure reproducible precision measurements in a short time. The system features a 4 MP dynamic industrial X-ray detector, offering increased sensitivity and faster scan cycles without compromising image quality. Waygate Technologies’ Scatter|correct technology further enhances image quality by removing scatter artifacts, particularly in highly absorbent samples.
Calibration and Validation for Consistent Accuracy
Regular re-calibration is essential for maintaining the specified measuring accuracy of CT systems. Waygate Technologies’ Ruby|plate calibration body, combined with True|position technology, provides an effective method for geometry correction. The Ruby|plate, calibrated with sub-micrometer accuracy, allows for automatic detection and correction of scale deviations, extending accuracy across all measuring positions. Recent software and hardware optimizations have reduced the calibration time for the Phoenix V|tome|x M from 40 minutes to as little as 8 minutes, enabling operators to perform calibrations efficiently.

Conclusion: CT as a Precision Measurement Tool
The high degree of automation in calibration and validation routines has reduced the time and expertise required for reproducible measurements with CT systems. The Phoenix V|tome|x M, with its exceptional measuring accuracy and reduced scanning times, demonstrates that CT technology is now a viable alternative for precision measurements in production environments. The integration of advanced technologies such as Ruby|plate and True|position has established CT as a reliable tool for achieving high precision in various industrial applications.
For more information: www.bakerhughes.com/waygate-technologies


