Cutting Tool Measurement and Grinding Machine Compensation Interface Expanded
As a tool maker it is imperative to ensure your geometry is exactly right to ensure a superior cutting performance. Getting this right gives the edge over competition and is what ultimately builds a successful tool maker’s reputation. Zoller’s measurement machines and ANCA software easily communicate to simplify and improve tool measurement, wheel measurement, form measurement and compensation processes. This partnership provides key benefits to our customers by automating and refining the tool measurement process.
Traditional tool measurement required grinding a tool and then manually taking it to a separate measurement machine to verify the design parameters, such as helix, outside diameter, and rake angle. The second consideration in the process is the tool compensation to ensure what is ground matches the original drawing parameters. The risk doing these steps manually is that there will be errors in the data, causing needless grinding waste.
 ANCA partnered with Zoller to build the infrastructure and shared systems to enable automatic communication between the Zoller and ANCA grinding machine, removing any need for manual input. For customers who set their machine shops to automate their tool grinding processes can deliver significant efficiencies, guarantees a better-quality tool and reduces waste.
Zoller measurement machines are widely adopted in the market as an effective tool for measuring complex geometry of cutting tools. While LaserPlus and iView are very popular and effective tools for in-process measurement of tool OD and profiles, the Zoller system can automatically measure a diverse range of tool features. Zoller is typically used for more detailed tool measurement during tool setup or intermittently during batch runs to ensure features remain in tolerance.
The original ANCA interface, including ToolRoom RN33.1, only supported XML format but the latest RN34.1 release now supports both XML and GDX interfaces. The GDX format is also compatible with other measurement machines that also support GDX import/export.
ANCA-ZOLLER Measurement Feedback
In developing a measurement and feedback process, for each parameter/feature ANCA and Zoller have worked together to agree upon a fixed Zoller measurement process and a fixed ANCA grinding parameter adjustment to which it is directly linked. Wheel adjustments are not supported as an option for this method of compensation. Adjustments are applied to parameters for compensation without changing the design parameters.
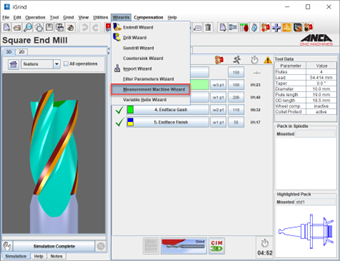
 The ToolRoom Measurement Wizard remains the easiest way to set up ANCA-Zoller measurement feedback which guides the user through the available list of features for a given tool. The user can easily select which features can be measured and have compensation applied. The user can also specify the required length/angle tolerance for each parameter so that values within tolerance will not be compensated when returned from Zoller.
Each feature is initially set with a default location for measurement (red line), although this can be manually adjusted before sending the data to Zoller for measurements and tolerance settings can be imported from another Tom file to avoid resetting all parameters and tolerances individually. When measurement data (GDX file) is imported to the ANCA grinder, the measured parameters are brought as nominal value but compared against design value and adjustments made accordingly. Values within tolerance are not be compensated but users have an option to override this function.
In the most recent cooperative development with Zoller, the range of tool features that can be measured for providing direct feedback to an ANCA grinding program has been significantly expanded.
For more information: machines.anca.com


